3App parts
The app container can contain various app parts. This allows different app types to be implemented.
The app parts are entered as optional entries in the app description. If these parts are present, the PLCnext runtime (AppManager) reacts accordingly.
The app description file must contain the Metadata JSON object "plcnextapp" and at least one optional app part.
The app description file must contain a JSON object with the name "plcnextapp", which describes the properties of the PLCnext app:
{
"plcnextapp": {
"name": "<app name>",
"identifier": "<App Identifier>",
"version": "<version>",
"target": "<target controller>",
"minfirmware_version": "<min plcnext firmware version>",
"manufacturer": "<plcnext app manufacturer>"
}
}
name:
Any name that describes the app.
identifier:
An unique app identifier assigned by the PLCnext store on app creation. It is going to be used for creating unique folder names, which will be marked with <App Identifier> throughout this guide.

version:
A version string identifying the current version of the app. The following notation should be observed:
–Full (external) version format:
<Name> ( <major>.<minor>.<patch>.<build> <state>)
Valid cases:
abc (1.2.3.4 alpha)
abc (1.2.3 alpha)
abc (1.2 alpha)
abc (1 alpha)
abc (1.2.3.4)
abc (1.2.3)
abc (1.2)
abc (1)
–Internal version format:
<major>.<minor>.<patch>.<build> <state>
Valid cases:
1.2.3.4 alpha
1.2.3 alpha
1.2 alpha
1 alpha
1.2.3.4
1.2.3
1.2
1
–Limitation of numerical values:
–major, minor and patch: Unsigned 8 bit
–built: unsigned 32 bit
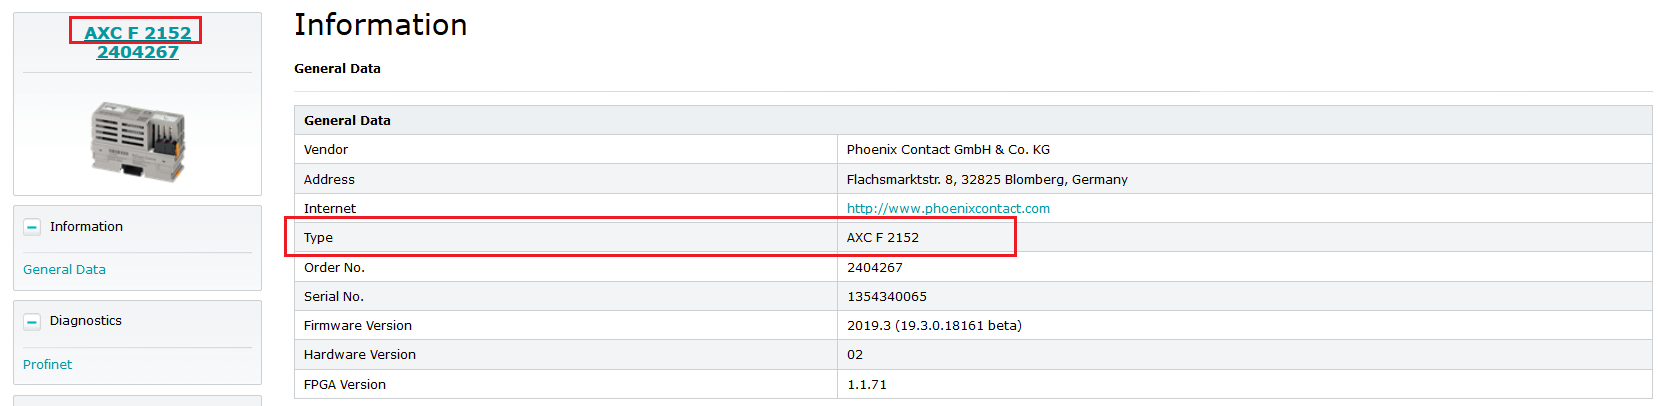
target:
the PLCnext controller this app is intended to run on. To be recognized automatically this string has to be identical to the representation in the WBM of the controller under Information/Type.
minfirmware_version:
the minimally required firmware version to run the app in the format <major version>.<minor version>.<fixes> e.g. 19.0.0 for the LTS version of 2019.
_16.png)
manufacturer:
Manufacturer name (optional entry. Default value is an empty string.)
A PLCnext Engineer Solution contains a complete PLCnext Engineer project configuration as an app part.
PLCnext Engineer App is called in the following Solution.
The user of a Solution does not need any programming knowledge to use the app. A solution is transferred directly from the PLCnext Store to a PLCnext Controller. To transfer a solution to your PLCnext Controller, the PLCnext Controller must be connected to the PLCnext Store.
A Solution usually contains a web interface. This interface can be used to adapt the solution with parameters. Please note, that a predefined hardware structure is required for the use of a Solution. The required hardware components are listed on the store page.
A Solution is locked. The source code is not public and cannot be changed.
Currently, only one Solution can be executed by one device at a time.
3.2.1Optional app part entry: engineerapp
If the optional JSON object "engineerapp" is present in the app description file, the AppManger knows that a complete PLCnext Engineer project is inside the app.
The "engineerapp" entry is structured as follows:
"engineerapp": {
"folder": "<local path>/PCWE"
}
folder:
Specifies in which directory within the app container the complete PLCnext Engineer project is stored. This makes it possible to build up the folder structure as desired within the app container.
3.2.2Steps to create and integrate a PLCnext Engineer Solution
Create the solution:
•Make sure that the controller firmware version is grater than 2019.0
•Make sure that the version of your PLCnext Engineer is compatible with the firmware of your PLCnext Controller.
•Program your PLCnext Engineer project.
•If necessary, license your PLCnext Engineer project.
•Download your PLCnext Engineer project to your PLCnext Controller.
•Test your PLCnext Engineer project.
Integrate the solution to your app:
•The files you need are in the PLCnext project folder /opt/plcnext/projects/PCWE/ . You should copy the project folder into your app folder. (e.g. with PUTTY "cp -r /opt/plcnext/projects/PCWE/ <app folder>/<subfolder for this part>/PCWE")
•Add the app part "engineerapp" (“Optional app part entry: engineerapp”) in your app description file.
3.2.3Specifications and restrictions
–Only one Engineer App may be active in the overall system.
–The activation of an Engineer App part requires a restart of the PLCnext firmware.
The demo app with an engineer part (solution app) contains a simple solution for flashing an LED (controlling a digital output) in an AXL F DO16 I/O module. The I/O module is controlled by the controller (AXC F 2152) via Axioline F.
The app description for the Demo Solution app is as follows:
{
"plcnextapp": {
"name": "EngineerApp AXIO",
"identifier": "EngineerApp_AXIO",
"version": "123.456data",
"target": "AXC F 2152",
"minfirmware_version": "19.0.0",
"manufacturer": "PhoenixContact"
},
"engineerapp": {
"folder": "/arp/PCWE/"
}
}
The following Demo EngineerApp files are available on GitHub HERE:
–Engineer-PCWE project folder in the directory arp
–App description file: app_info.json
–App container file: EngineerApp_AXIO.app
A Command Line Tools app part makes it possible to integrate functionalities (cmd tools) into a PLCnext system that are usable via the command line and that can be started from a shell without specifying the full path to the tool executable binary.
3.3.1Optional app part entry: cmdtools
If the optional JSON object "cmdtools" is present in the app description file, the AppManager knows that at least one command line tool (or an exe file) is inside the app.
The "cmdtools" entry is structured as follows:
"cmdtools":
[
{
"path" : "<path to cmd tool 1 binary>"
},
{
"path" : "<path to cmd tool 2 binary>"
},
{
"path" : "<path to cmd tool [N] binary>"
}
]
"path":
Specifies the path to the executable binary file of the corresponding command line tool within the app container.
3.3.2Steps to create and integrate CMD Tools
Create the command line tools:
•Program your command line tools.
•If necessary, license your command line tools.
•Build your command line tools using the PLCnext Software Development Kit.
•Test your command line tools.
Integrate the cmd tool(s) to your app:
•The files you are going to need are the binaries of your tool and possibly necessary configuration files. If they are on your PC, it is easiest to copy them with a SFTP-client into your app folder on the Controller.
•Please make sure that your binaries are executable and have the correct access rights, because you cannot change them after installing the Read-Only app container.
•Add the app part "cmdtools" for the cmd tools (“Optional app part entry: cmdtools”) in your app description file.
3.3.3Specifications and restrictions
–An app container can optionally contain several command line tools.
–Several command line tools may be active simultaneously in the system.
–The names of the activated command line tools must not occur more than once (neither in an app container nor in all directories of the PATH environment variable).
–Access rights to the tools' executable files must be set in advance (SquashFs Read-Only Filesystem).
–The activation/deactivation of a command line tool does not require a restart of the PLCnext firmware.
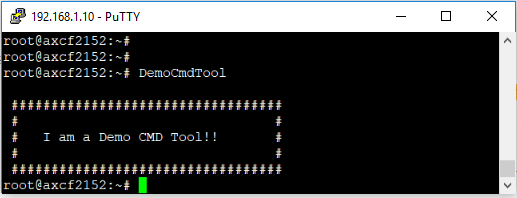
To demonstrate an app with a CmdTool App-Part a simple tool was developed, which is installed in an app and displays a text message on the console when called from the command line.
The C++ source code for the DemoCmdTool:
#include <iostream>
int main(void)
{
std::cout << std::endl;
std::cout << " ##################################" << std::endl;
std::cout << " # #" << std::endl;
std::cout << " # I am a Demo CMD Tool!! #" << std::endl;
std::cout << " # #" << std::endl;
std::cout << " ##################################" << std::endl;
}
The app description for the DemoCmdTool is as follows:
{
"plcnextapp": {
"name": "Demo Cmd Tools App",
"identifier": "DemoCmdToolsApp",
"version": "123.456cmdtool",
"target": "AXC F 2152",
"minfirmware_version": "19.0.0",
"manufacturer": "PhoenixContact"
},
"cmdtools":
[
{
"path" : "/bin/DemoCmdTool"
}
]
}
The following sources for the cmd tool demo application are available on GitHub HERE:
–Source file of the Cmd-Tool: DemoCmdTool.cpp
–App description file: app_info.json
–DemoCmdTool" binary file in "bin" directory
–App container file: DemoCmdToolApp.app
|
|
|
Note: The identifiers used in the app descriptions of the illustrated demo applications have only demo values. The AppID generated in the PLCnext Store on app creation must be used! |

After activating the DemoCmdToolApp, the DemoCmdTool can be called from a shell without specifying its full path:
|
|
|
Reminder: Permissions to run the DemoCmdTool app must be set before creating the app container file. |

It can happen that an exe file integrated in the app container, such as a command line tool, brings its own shared libraries with
it and needs them for its execution. Such shared libraries can be integrated into the app container and made known to the
Linux system when the app is installed/activated.
|
|
|
Note: Libraries of (new) PLCnext components are dynamically loaded by specifying their full path when loading the component into the PLCnext firmware. Therefore, they do not have to be specified as "sharedlibs" in the app description. |

3.4.1Optional app part entry: sharedlibs
If the optional JSON object "sharedlibs" is present in the app description file, the AppManager knows that shared libraries are in the app.
The "sharedlibs" entry is structured as follows:
"sharedlibs":
[
{
"libpath" : "/lib/DemoLib1.so"
},
{
"libpath" : "/lib/DemoLib2.so"
}
]
"libpath":
Specifies the local path to the shared library in the app container.
3.4.2Steps to create and integrate Shared Libraries
If own developed shared libraries are needed, create the shared libraries:
•Program your shared libraries (or Library).
•If necessary, license your shared libraries.
•Build your shared libraries using the PLCnext Software Development Kit.
•Test your shared libraries.
Integrate the shared libraries to your app:
•The files you are going to need are the binary files of your shared libraries. If they are on your PC, it is easiest to Copy them with a SFTP-client into your app folder on the Controller.
•Add the app part "sharedlibs" (“Optional app part entry: sharedlibs”) for the shared libraries in your app description file.
3.4.3Specifications and restrictions
–An app container can optionally contain several shared libraries.
–The activation/deactivation of a shared library app component does not require a restart of the PLCnext firmware.
–The names of the activated Shared Libraries within a container or within all activated apps must not occur more than once.
3.4.4Demo Shared Libraries App
(currently not available)
A (Linux) daemon can be integrated into a PLCnext system in the form of an app. After its activation, it is entered into the Linux system start and started independently of the PLCnext runtime. A daemon that is independent of the PLCnext runtime is called a "Linux daemon".
The start time (priority) of the daemon in the Linux system start can be defined via corresponding settings in the app_info.json.
When the app is activated, an initialization script is automatically created and entered in the /etc/init.d directory. The initialization script is created according to the default template unless a different template is specified in the app_info.json. The initialization script is then entered in the Linux system startup with the specified priority. The initialization script created under /etc/init.d is given the following name:
<Daemon executable binary name>-<App-Identifier>
e.g.:
/etc/init.d/SampleLinuxDaemon-SampleLinuxDaemonApp
The following attached init script template is used to create the init script.
#!/bin/sh
NAME="@@@DAEMONNAME@@@"
echo "name = $NAME"
DESCRIPTION="App "
# Path to Daemon binary
DAEMON="@@@BINARYPATH@@@"
DAEMON_ARGS="@@@ARGS@@@"
# Exit if Daemon binary not install is not installed
if ! [ -x $DAEMON ]
then
if [ -e $DAEMON ]
then
echo " Error - Daemon file $DAEMON has no execute permission. Exit"
else
echo " Error - Daemon file $DAEMON not found. Exit"
fi
exit 0
fi
# Read configuration variable file if it is present
[ -r /etc/default/$NAME ] && . /etc/default/$NAME
# Starting Daemon <NAME> <DAEMON_ARGS>
dm_start()
{
start-stop-daemon --start --quiet --exec $DAEMON -- $DAEMON_ARGS --chdir=&
}
# Stopping Daemon <NAME> <DAEMON_ARGS>
dm_stop()
{
DAEMON_PID=$(pidof ${DAEMON})
echo "PID of $DAEMON = " ${DAEMON_PID}
start-stop-daemon --stop --quiet --retry=TERM/30/KILL/5 --exec $DAEMON &
start-stop-daemon --stop --quiet --oknodo --retry=0/30/KILL/5 --exec $DAEMON &
TIMEOUT_COUNTER=0
TIMEOUT=3
while [ ! -z "$DAEMON_PID" -a $TIMEOUT_COUNTER -lt $TIMEOUT ]; do
sleep 1;
TIMEOUT_COUNTER=$[$TIMEOUT_COUNTER + 1]
done
}
# Sending a SIGHUP signal to Daemon <NAME> <DAEMON_ARGS>
dm_reload() {
start-stop-daemon --stop --signal 1 --quiet --name $NAME &
}
case "$1" in
start)
echo "Starting $DESCRIPTION " "$NAME"
dm_start
echo "$NAME" " daemon started"
;;
stop)
echo "Stopping $DESCRIPTION" "$NAME"
dm_stop
echo "$NAME" " daemon stopped"
;;
restart)
echo "Restarting $DESCRIPTION" "$NAME"
dm_stop
dm_start
echo "$NAME" " daemon started"
;;
*)
echo "Usage: /etc/init.d/$NAME {start|stop|restart}" >&2
esac
When the app is deactivated, the Linux daemon is stopped and removed from the Linux system startup.
From a shell the independent daemon:
–To be started: /etc/init.d/<daemon init-script> start
–To be stopped: /etc/init.d/<daemon init-script> stop
–Restarted: /etc/init.d/<daemon init-script> restart
3.5.1Necessary additions in the app description file
The "linuxdaemons" entry is structured as follows:
"linuxdaemons":
[
{
"path" : "/bin/LinuxDaemonDemo",
"cmdargs" : "<Arg1 Arg2 ... ArgN>",
"starttime" : "99"
},
{
"path" : "<Path to daemon binary>",
"cmdargs" : "<Arg1 Arg2 ... ArgN>",
"starttime" : "<priority>"
"initScriptTemplate":<Path to app specific init script template>
}
]
path:
Specifies the local path to the executable binary file of the daemon in the app container.
cmdargs:
Command line arguments passed at daemon startup.
starttime:
Start priority of the daemon script.
initScriptTemplate:
(optional field) A custom InitSkript template can be used to extend the script functionality instead of the provided one. Please note that all variables initialized by AppManagement when activating the app must be retained.
The service/daemon gets the value "defaults" for the runlevel when registering. Therefore it starts in the runlevels 0,1,2,3 and stops in 4, 5, 6.
|
Variable |
Bedeutung |
|---|---|
|
@@@DAEMONNAME@@@ |
Name of the daemon, formed from the filename of the binary |
|
@@@BINARYPATH@@@ |
The absolute path of the binary of the daemon after the app is mounted. |
|
@@@ARGS@@@ |
Arguments from the part configuration linuxdaemons.cmdargs |
The following variables can also be used if required:
|
Variable |
Bedeutung |
|---|---|
|
@@@APPNAME@@@ |
The appname from the app_info.json |
|
@@@APPIDENTIFIER@@@ |
The identifier from the app_info.json |
|
@@@APPVERSION@@@ |
The version from the app_info.json |
|
@@@APPMANUFACTURER@@@ |
The manufacturer from the app_info.json (plcnextapp.manufacturer) |
|
@@@APPDIRECTORY@@@ |
Directory in which the app is mounted |
|
@@@APPTEMPDIRECTORY@@@ |
Temp. directory for the app |
|
@@@APPDATADIRECTORY@@@ |
Data directory for the app |
3.5.2Steps to create and integrate Linux Daemons
Create the Linux Daemons:
–Program your linux daemons (or Daemon).
–If necessary, license your linux daemons.
–Build your linux daemons using the PLCnext Software Development Kit.
–If you want to use a custom initialization/start script template you have to supply that as well.
–Test your linux daemons.
Integrate the linux daemon(s) to your app:
–The files you are going to need in the app folder are:
–The executable binary file(s) for the daemon process(es) you want to run
–The custom initialization/start scripts for the daemon(s) if needed.
–Configuration and licensing files if necessary.
–Add the optional app part "linuxdaemons" (“Necessary additions in the app description file”) for the linux daemon(s) in your app description file.
3.5.3Specifications and restrictions
–Several Linux daemons may be active simultaneously in the system.
–An app container can contain several Linux daemons.
–The names of the activated Linux daemons (binaries) within a container must not occur more than once.
–The activation/deactivation of a Linux daemon does not require a restart of the PLCnext firmware.
In the SampleLinuxDaamon app the simple program "SampleLinuxDaemon" is started as a Linux daemon, which permanently reads the current time stamp in an endless loop every second and writes it into a log file linuxDaemonOut.log.
The source code for the SampleLinuxDaemon:
#include <stdio.h>
#include <iostream>
#include <string>
#include <fstream>
#include <chrono>
#include <stdlib.h>
#include <unistd.h>
#include "cppformat/format.h"
const std::string appIdentifier = "SampleLinuxDaemon";
std::string GetCurrentTimeStamp()
{
std::string result = "";
auto now = std::chrono::system_clock::now();
time_t cnow = std::chrono::system_clock::to_time_t(now);
struct tm* tmDateTime = std::localtime(&cnow);
const char * timeFormatStr = "%02d%02d%d-%02d%02d%02d";
result = fmt::sprintf(timeFormatStr,
(tmDateTime->tm_year + 1900),
(tmDateTime->tm_mon + 1),
tmDateTime->tm_mday,
tmDateTime->tm_hour,
tmDateTime->tm_min,
tmDateTime->tm_sec);
return result;
}
int main(void)
{
std::cout << "Starting Sample Linux Daemon" << std::endl;
char* plcnextAppsDataDir = getenv ("APPDATADIRECTORY");
std::string appPersistentDataDir;
// Get Apps persistent Data directory
if(plcnextAppsDataDir != NULL)
{ // Variant 1 to get persistent data storage path (via app identifier)
std::cout << "Couldn’t get persistent data dir env variable, using default path" << std::endl;
appPersistentDataDir = "/opt/plcnext/appshome/data/" + appIdentifier;
}
else
{
// Variant 2 to get persistent data storage path (via environment variable exported/passed in the init script)
}
std::cout << " Daemon persistent Data dir = " << appPersistentDataDir << std::endl;
std::string logFile = appPersistentDataDir + "/linuxDaemonOut.log";
std::ofstream outfile(logFile, std::ofstream::out | std::ofstream::app);
std::cout << " Daemon log data file = " << logFile << std::endl;
unsigned int counterValue = 0;
while(1)
{
outfile << GetCurrentTimeStamp() << " - counter = " << counterValue++ << std::endl;
//std::cout << "Current Time Stamp = " << GetCurrentTimeStamp() << std::endl;
sleep(1);
}
outfile.close();
return 0;
}
For the daemon, persistent data/file storage must be enabled. The log file can then be created in the persistent storage directory of the app "ARP_APPS_DATA_DIR/<App Identifier>" and the data can be logged.
|
|
|
Note: App identifiers and app-specific data can also be determined automatically in a separate initScript template and passed to the daemon e.g. via command line arguments. See “Necessary additions in the app description file”. |

The app description for the SampleLinuxDaemon is as follows:
{
"plcnextapp": {
"name": "Sample Linux Daemon App",
"identifier": "SampleLinuxDaemon",
"version": "123.456data",
"target": "AXC F 2152",
"minfirmware_version": "19.0.0",
"manufacturer": "PhoenixContact"
},
"datastorage": {
"persistentdata": true,
"temporarydata" : true
},
"linuxdaemons" :
[
{
"path" : "/bin/SampleLinuxDaemon",
"cmdargs" : "",
"starttime": "99"
}
]
}
The following sources for the sample linux daemon app are available on GitHub HERE:
–Source file of the Linux daemon: SampleLinuxDaemon.c
–App description file: app_info.json
–Binary file "SampleLinuxDaemon" in directory "bin
–App container file: SampleLinuxDaemon.app
Extensions of the PLCnext runtime can be integrated into a PLCnext system in the form of an app. With a PLCnext extension, the PLCnext runtime can be extended by the following elements:
–A process dependent on the PLCnext runtime (PLCnext process)
–A PLCnext component (PLCnext component)
–A PLCnext shared library (PLCnext library), which usually belongs to a PLCnext component
PLCnext extensions are integrated by including Acf config files when the PLCnext runtime is started. An Acf configuration file can contain any number of entries or extensions of the three element types listed above. The overall Layout of Configuration file is as follows:
<?xml version="1.0" encoding="UTF-8"?>
<AcfConfigurationDocument
xmlns="http://www.phoenixcontact.com/schema/acfconfig"
xmlns:xsi="http://www.w3.org/2001/XMLSchema-instance"
xsi:schemaLocation="http://www.phoenixcontact.com/schema/acfconfig.xsd"
schemaVersion="1.0" >
<Processes></Processes>
<Libraries></Libraries>
<Components></Components>
</AcfConfigurationDocument>
|
|
|
Note: –A list with all the environment variables used and their definitions can be found HERE. –All path can be specified as either absolute, e.g. $ARP_ACTIVE_APPS_DIR$/<App Identifier>/Runtime/Runtime.o or relative to the storage location of the ACF configuration file unless stated otherwise. –In addition, an Acf settings file is required to start a PLCnext process and will be illustrated in the following sections. |

3.6.1Template Acf settings/config files
The following demo Acf settings/configuration files can be used as templates to extend the PLCnext runtime.
Template Acf settings file
<?xml version="1.0" encoding="UTF-8"?>
<AcfSettingsDocument
xmlns="http://www.phoenixcontact.com/schema/acfsettings"
xmlns:xsi="http://www.w3.org/2001/XMLSchema-instance"
xsi:schemaLocation="http://www.phoenixcontact.com/schema/acfsettings.xsd"
schemaVersion="1.0" >
<RscSettings path="/etc/plcnext/device/System/Settings/Rsc.settings"/>
<LogSettings logLevel="Debug" logDir="$ARP_APPS_DATA_DIR$/<App Identifier>/Logs" />
<EnvironmentVariables>
<EnvironmentVariable name="ARP_BINARY_DIR" value="/usr/lib" />
</EnvironmentVariables>
</AcfSettingsDocument>
This file contains among other definitions:
–RscSettings "path" (optional): Absolute path to the RSC settings file on the controller.
–LogSettings "logdir" (optional): Path for storing the log data of the runtime process. The following element of the path is entered by the app developer:
–<App Identifier>: Identifier of the corresponding app.
–EnvironmentVariables: The environment variables are exported on the PLCnext process start and can be used within the process and within its plcnext components and plcnext libraries.
Template Acf configuration (PLCnext Process Extension)
A template file for the Acf configuration file for a PLCnext process Extension:
<?xml version="1.0" encoding="UTF-8"?>
<AcfConfigurationDocument
xmlns="http://www.phoenixcontact.com/schema/acfconfig"
xmlns:xsi="http://www.w3.org/2001/XMLSchema-instance"
xsi:schemaLocation="http://www.phoenixcontact.com/schema/acfconfig.xsd"
schemaVersion="1.0" >
<Processes>
<Process name="<Process Name>"
binaryPath="<Process Binary Path>"
workingDirectory="$ARP_APPS_DATA_DIR$/<App Identifier>"
args="<Acf settings path>"/>
</Processes>
<Libraries>
<Library name="Arp.Plc.AnsiC.Library"
binaryPath="$ARP_BINARY_DIR$/libArp.Plc.AnsiC.so" />
</Libraries>
<Components>
<Component
name="Arp.Plc.AnsiC"
type="Arp::Plc::AnsiC::AnsiCComponent"
library="Arp.Plc.AnsiC.Library" process="<Process Name>">
<Settings path="" />
</Component>
<Component name="Arp.Plc.DomainProxy.IoAnsiCAdaption"
type="Arp::Plc::Domain::PlcDomainProxyComponent"
library="Arp.Plc.Domain.Library" process="<Process Name>">
<Settings path="" />
</Component>
</Components>
</AcfConfigurationDocument>
The runtime is started in a PLCnext process. The configuration of the runtime process includes:
"name":
Name of the runtime process: Replaces the field "<Runtime Name>"
"binaryPath":
Relative path (from the storage location of the Acf configuration file) to the executable binary file of the PLCnext runtime, which is to be started as PLCnext process
"WorkingDirectory":
Absolute path to the working directory of the runtime process. The following element of the path is entered by the app developer:
<App Identifier>: Identifier of the corresponding app
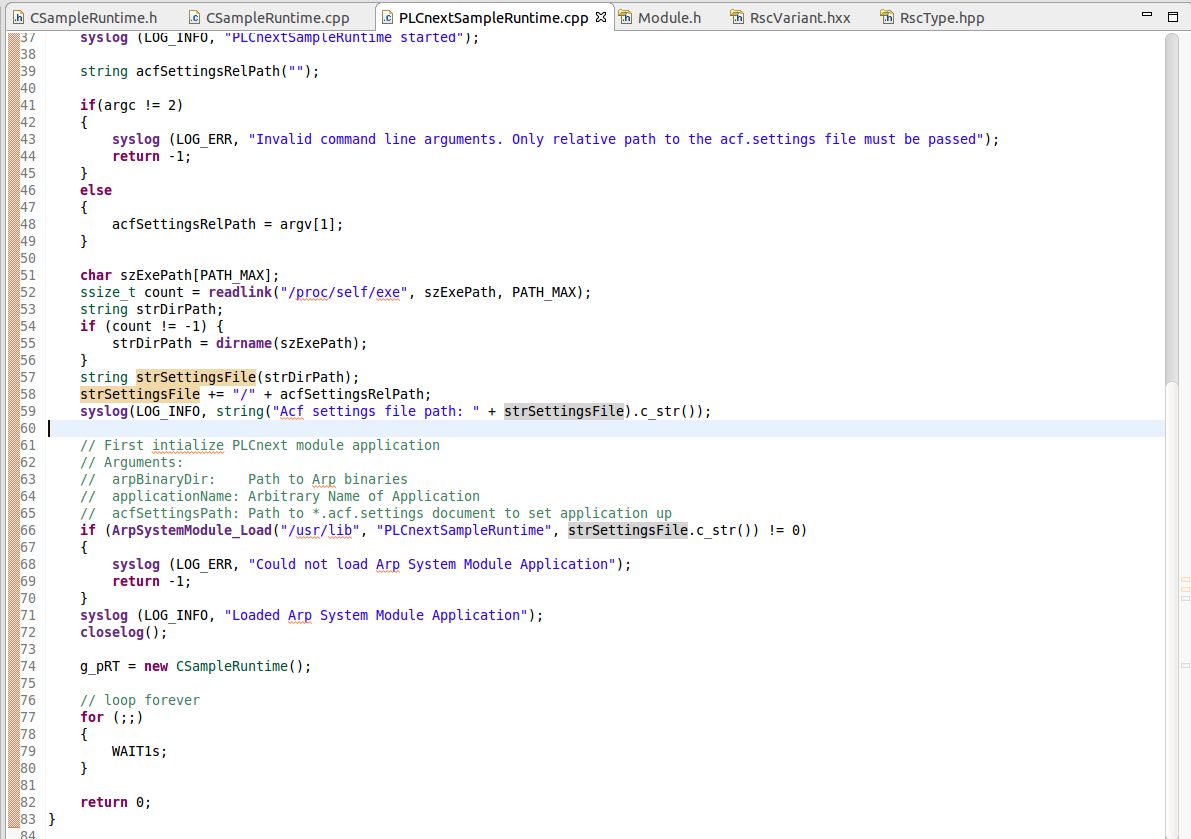
"args":
An optional field. In this example, the relative path (from the location of the PLCnext Runtime binary file) to the .acf.settings file is passed. E.g. Default.acf.settings or ../settings/Default.acf.settings. Thus, the absolute path to the Acf settings file can be easily determined by the runtime process without knowledge of the app identifiers.
|
|
|
Note: Relative paths are used here to simplify configuration. The app developer has the free choice of how to specify his paths. These can also be specified as absolute paths. E.g. $ARP_ACTIVE_APPS_DIR$/<identifier>/Runtime/Runtime.ExeBinary. It is easiest to have all runtime files in the same directory (see "Demo application" at the end). |

The configuration file also contains the required libraries and PLCnext components. This example shows PLCnext libraries/components that are already on the PLCnext device.
See Demo PLCnext Runtime App (PLCnext-Process).
Template Acf configuration (PLCnext Component Extension)
A template file for the Acf configuration file for a PLCnext component extension DemoPlcnextComponentTemplate.acf.config:
<?xml version="1.0" encoding="UTF-8"?>
<AcfConfigurationDocument
xmlns="http://www.phoenixcontact.com/schema/acfconfig"
xmlns:xsi="http://www.w3.org/2001/XMLSchema-instance"
xsi:schemaLocation="http://www.phoenixcontact.com/schema/acfconfig.xsd"
schemaVersion="1.0" >
<Libraries>
<Library name="<Library Name>" binaryPath="<Library Path>" />
</Libraries>
<Components>
<Component name="<Component Name>"
type="<Component type>"
library="<Library Name>"
process=""
condition="<Support Con>">
<Settings path="<Settings Path>" />
</Component>
</Components>
</AcfConfigurationDocument>
The configuration of the library of the PLCnext component contains:
"name":
Name of the PLCnext library: Replaces the field "<Library Name>"
"binaryPath":
Relative path (from the storage location of the Acf configuration file) to the library file of the PLCnext component.
The configurations of the PLCnext component contain
"name":
Name of the PLCnext component (taking the namespace into account)
"type":
Component type. As shown in the example
"library":
Name of the previously configured PLCnext library
"condition":
Condition for starting the component (optional)
Settings - "path":
Relative path (from the location of the Acf configuration file) to the settings file of the component (optional)
As already mentioned, any combination of PLCnext extensions of components and processes in a .acf.config file is possible.
|
|
|
Note: Serious errors in a PLCnext child process (runtime process) such as a "segmentation fault" or configuration/parsing errors in the .acf.config/.acf.settings files cause the complete PLCnext runtime to crash during loading or runtime. |

3.6.2Necessary additions in the app description file for plcnextextensions
If the optional JSON object "plcnextextensions" is present in the app description file, the AppManager knows that at least one PLCnext extension is inside the app.
The "plcnextextensions" entry is structured as follows:
"plcnextextensions":
[
{
"acfconfigpath" : "/config/PLCnextRuntimeDaemon.acf.config"
},
{
"acfconfigpath" : "/config/Daemon2.acf.config"
}
]
acfconfigpath:
Specifies the local path to the Acf configuration file of the daemon in the app container.
3.6.3Steps to create and integrate PLCnext Extensions
Create the PLCnext Extensions:
•Program your PLCnext Extensions (processes, libraries, components).
•If necessary, license your plcnext extensions.
•Build your PLCnext Extensions using the PLCnext Software Development Kit.
•Test your PLCnext Extensions.
Integrate the PLCnext Extensions to your app:
•The files you are going to need are:
–The Acf configuration files mentioned in the app_info.json
–All binaries, shared libraries and settings files referenced from the configuration file.
•If they are on your PC, it is easiest to copy all these with a SFTP-client into your app folder on the Controller.
•Add the optional app part "plcnextextensions" (“Necessary additions in the app description file for plcnextextensions”) for the shared libraries in your app description file.
3.6.4Specifications and restrictions
–An app container can contain several PLCnext extensions
–Several PLCnext extensions may be active simultaneously in the system as long as they have no inconsistent configurations
–The activation/deactivation of a PLCnext extension requires a restart of the PLCnext firmware
Required app components:
–Persistent memory
3.6.5Demo PLCnext Runtime App (PLCnext-Process)
The general task or function of the demo runtime:
–Read process data (in this case three simple counter variables) from the IEC 61131 runtime eCLR and write them to a log file
–The appropriate PLCnext Engineer project is required for this. This is made available in the demo app container at the end of this section
The app description for the PLCnextSampleRuntime app is as follows:
{
"plcnextapp": {
"name": "Plcnext Sample Runtime Extension App",
"identifier": "PLCnextSampleRuntime",
"version": "123.456data",
"target": "AXC F 2152",
"minfirmware_version": "19.0.0",
"manufacturer": "PhoenixContact",
},
"engineerapp": {
"folder": "/arp/PCWE/"
},
"datastorage": {
"persistentdata": true,
"temporarydata" : true
},
"plcnextextensions" :
[
{
"acfconfigpath": "/SampleRuntime/PLCnextSampleRuntime.acf.config"
}
]
}
The following sources for the demo plcnext runtime extension app are available on GitHub HERE.
–Eclipse project with C++ source files of the runtime process in the PLCnextSampleRuntime folder. The Eclipse project is based on https://github.com/PLCnext/SampleRuntime and was modified accordingly for the demo app
–The folder SampleRuntime with:
–Required Acf configuration file PLCnextSampleRuntime.acf.config
–Required Acf settings file Default.acf.settings
–Binary file of the Runtime PLCnextSampleRuntime
–The app_info.json file of the app
–The PLCnext Engineer-PCWE project folder with the appropriate solution in the arp folder.
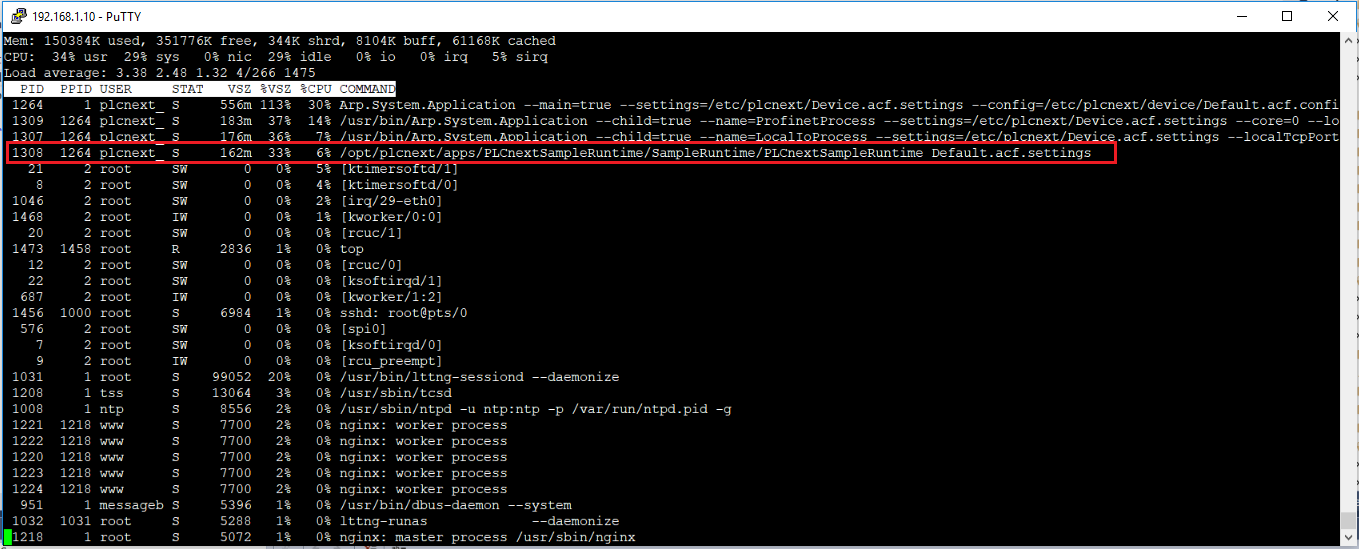
After activating the app, the system is restarted. Then the PlcnextRuntime is running and its process can be seen in the Linux process list:
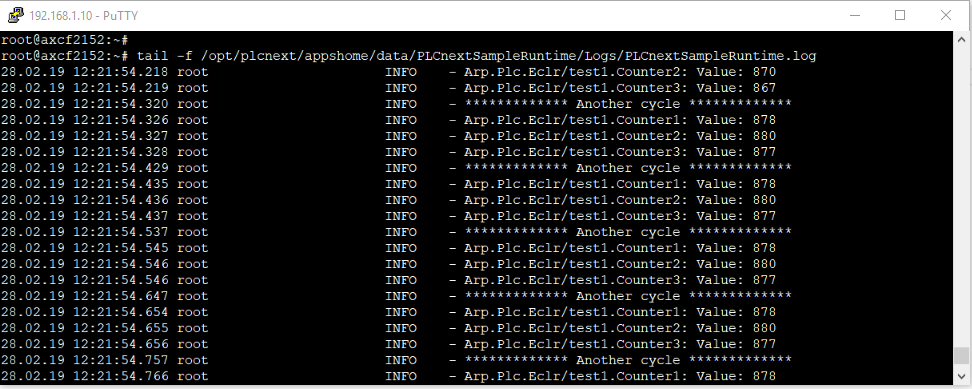
The permanent writing of the counter values can be observed in the PLCnextSampleRuntime-log file:
|
|
|
Note: All binaries are for the AXC F 2152 controller and only executable on this controller. |

3.6.6Demo PLCnext Component App
|
|
|
Note: First the Wbm component is used for demonstrating. This must be replaced by a corresponding demo PLCnext component after its completion. |

In the Demo PLCnext Component App the Wbm component is installed into the PLCnext system via a PlcnextExtensions app part. To test this, all files and entries of the Wbm component would have to be removed from the target. Therefore, make sure to back them up in advance:
–The Wbm library: /usr/lib/libArp.Services.Wbm.so
–The entry for the Wbm component from /etc/plcnext/device/Libraries.acf.config
–The entry for the Wbm component from /etc/plcnext/device/MainProcess.acf.config
The app description for the WbmComponentApp is structured as follows:
"plcnextapp": {
"name": "Wbm Component App",
"identifier": "WbmComponentApp",
"version": "123.456data",
"target": "AXC F 2152",
"minfirmware_version": "19.0.0",
"manufacturer": "PhoenixContact",
},
"datastorage": {
"persistentdata": true,
"temporarydata" : false
},
"plcnextextensions" :
[
{
"acfconfigpath": "/wbm/WbmComponent.acf.config"
}
]
}
The corresponding WbmComponent.acf.config file is structured as follows:
<?xml version="1.0" encoding="UTF-8"?>
<AcfConfigurationDocument
xmlns="http://www.phoenixcontact.com/schema/acfconfig"
xmlns:xsi="http://www.w3.org/2001/XMLSchema-instance"
xsi:schemaLocation="http://www.phoenixcontact.com/schema/acfconfig.xsd"
schemaVersion="1.0" >
<Libraries>
<Library name="Arp.Services.Wbm.Library"
binaryPath="libArp.Services.Wbm.so" />
</Libraries>
<Components>
<Component name="Arp.Services.Wbm"
type="Arp::Services::Wbm::WbmComponent"
library="Arp.Services.Wbm.Library"
process=""
condition="$ARP_WBM_SUPPORT$">
<Settings path="" />
</Component>
</Components>
</AcfConfigurationDocument>
The following sources for the demo plcnext wbm component extension app are available on GitHub HERE.
–The folder wbm with:
–Required Acf configuration file WbmComponent.acf.config
–Shared Library Binary of the Wbm component libArp.Services.Wbm.so
–The app_info.json file of the app
–App-Container File WbmComponentApp.app
3.7Configuration of the PLCnext Runtime Services
If you need access or sometimes exclusive access to PLCnext System Services in your app or a PLCnext System Service is not allowed to be running when your app run, you can state this in the "plcnextservices" field of the app_info.json. This is often not necessary because there are defaults in place which will suffice for most cases. If you specify your own requirement for a service, the default action for that service will be overwritten. In case there are multiple app parts in your app and their default actions contradict each other, you have to specify an action explicitly or you will get an inconsistency error and installation of the app will be prevented.
The app description contains an optional field in which the relevant PLCnext System Services are listed with one of the following actions:
–Exclusive Access: Exclusive access to the PLCnext System Service is required
–Must have: PLCnext System Service must be present
–Must not have: PLCnext System Service must not be present
When an app is activated, the configurations of the PLCnext System Services are checked for consistency using the procedure described in the section Consistency Check of the PLCnext System Services.
3.7.1Necessary additions in the app description file for plcnextservices
If the optional JSON object "plcnextextensions" is present in the app description file, the AppManager knows that at least one configuration for controlling the PLCnext features/services is located within the app.
The "plcnextservices" entry is structured as follows:
"plcnextservices":
[
{
"service" : "<service id 1>",
"action" : "<action id 1>"
},
<service configuration 2>,
...
<service configuration n>
]
service:
Identifier of the PLCnext system service to be configured (see “Defined PLCnext Runtime Services”)
action:
Action/setting for this service (See possible actions in the section “Defined PLCnext Runtime Services”)
3.7.2Defined PLCnext Runtime Services
The following PLCnext features/services can be configured in the system via the "plcnextservices" entry in the PLCnext Runtime Services Configuration section:
|
PLCnext Runtime Service ID |
Description |
|---|---|
|
WBM |
Web Based Management |
|
EHMI |
Embedded HMI |
|
PROFINET |
PROFINET Process Field Network |
|
OPCUA |
Open Platform Communications Unified Architecture |
|
FWM |
Configuring the Linux firewall filter rules with the nftables tool. E.g. via the WBM |
|
TRACING |
Controlling Lttng Traces and Trace Sessions |
|
DATALOGGER |
Support for the Datalogger |
|
IEC |
Support for PLCnext IEC 61131 Runtime |
Possible actions for the PLCnext Runtime Services are defined in the following Table:
|
Possible action |
Meaning and restrictions |
|---|---|
|
EXCLUSIVE_ACCESS |
The service must be running and no other app may be requiring the service. |
|
MUST_HAVE |
The service must be running and no app may request exclusive access. |
|
MUST_NOT_HAVE |
The service must be disabled. |
3.7.3Default PLCnext Runtime Services of the app types
Some app types such as a PLCnext EngineerApp require certain PLCnext System Services such as PROFINET by default for execution. So that the app developer does not have to know these PLCnext System Services, which are essential for an app type, in advance and enter them in the app description, they are taken into account in the system by default.
The following applies:
–Default system services, which in turn are explicitly configured in the app description, are overwritten with the corresponding actions/values of the app description.
–Default configurations of the apps are checked for inconsistency when several app types are used in one app container.
First, the following default PLCnext system services with the corresponding actions (see “Configuration of the PLCnext Runtime Services”) are defined or considered in the system:
"EngineerApp":
"IEC": "EXCLUSIVE_ACCESS"
"PROFINET": "EXCLUSIVE_ACCESS"
"EHMI": "EXCLUSIVE_ACCESS"
"OPCUA": "MUST_HAVE"
The following system services must not be configured or switched off via the AppManager:
–AppManager
–Proficloud
When configuring PLCnext Services in an app, the default settings of an app type are overwritten if they match. The following must be observed:
–The "plcnextservices" entry is not present in the app description: If a service ID occurs several times with inconsistent actions in the default configurations, an inconsistency error is reported (see following section) and the app installation is prevented.
–The "plcnextservices" entry is present in the app description: If a service ID occurs several times in the default configurations, these are removed and replaced with the "one" service setting from the app description.
3.7.4Consistency check of the PLCnext Runtime Services
The actions (MUST_HAVE, MUST_NOT_HAVE and EXCLUSIVE_ACCESS) of the individual PLCnext features are evaluated. An inconsistency of the configurations for a PLCnext System Service occurs in at least one of the following cases:
–A PLCnext System Service has at least two different actions at several points simultaneously. E.g. in one app MUST_HAVE and in another MUST_NOT_HAVE
–A PLCnext System Service has at least two simultaneous actions of type EXCLUSIVE_ACCESS in at least two places.
For a PLCnext System Service, the following combinations of actions are permissible at the same time:
–Several entries only with the action MUST_HAVE or several entries only with the action MUST_NOT_HAVE.
–Or only one EXCLUSIV_ACCESS entry.
3.7.5Specifications and restrictions
–The affected services are to be switched off at system start of the PLCnext runtime. I.e. a restart of the PLCnext firmware is necessary after activation of the app.
–It is not possible to switch off/activate PLCnext services at runtime.
–The original PLCnext system state can be restored after deactivation of the app.
3.7.6Demo app to configure PLCnext Runtime Services
In the demo app for configuring PLCnext System Services, the Wbm-Plcnext component is switched off. For this the action "MUST_NOT_HAVE" is configured for the PLCnext Service with the ID "WBM", therefore the name "SC_WBM-MNH" is selected for the app.
The app description for the SC_WBM-MNH app is as follows:
{
"plcnextapp":
{
"name": "Services Config App",
"identifier": "SC_WBM-MNH",
"version": "1.001",
"target": "AXC F 2152",
"minfirmware_version": "19.0.0",
"manufacturer": "PhoenixContact",
},
"plcnextservices" :
[
{
"service" : "WBM",
"action" : "MUST_NOT_HAVE"
}
]
}
In the following sources for the demo PLCnext Services Config App are available on GitHub HERE:
–The app description file app_info.json
–The App-Container File SC_WBM-MNH.app
The files of an app container are unpacked into a read-only filesystem mounted via SquashFS, so that the apps cannot save/store data/files in their installation directory at runtime.
The app description can be used to specify whether a persistent and/or temporary location is required. This will be created by the AppManager if the corresponding entry is present.
Persistent memory is created on a storage medium (e.g. internal or external SD card) and is available again after a restart of the device. It should be noted here that SD cards cannot be rewritten as often as required due to their design and can therefore age. An app may only write files to the medium in rare cases (under no circumstances in short cycles of only a few seconds). The automatic closing of files in case of power failure or reset of the controller is not supported by the system. The app must be able to recognize corrupt files and handle them accordingly.
The temporary memory is created as ramdisk and is emptied after each power failure or reset of the controller.
The following environment variables from section Directories and PLCnext environment variables are required:
–ARP_APPS_DATA_DIR : Root storage directory of the persistent data of all apps
–ARP_APPS_TEMP_DIR: Root storage directory of the temporary data of all apps
If a persistent memory is required by the app, a folder is created under ARP_APPS_DATA_DIR. This folder contains the identifier of the app. An app can store its persistent data in the following folder: ARP_APPS_DATA_DIR/<identifier>
If a temporary memory is required by the app, a folder is created under ARP_APPS_TEMP_DIR. This folder contains the identifier of the app. An app can store its temporary data in the following folder: ARP_APPS_TEMP_DIR/<identifier>
3.8.1App description file optional entry: datastorage
If the optional JSON object "datastorage" is present in the app description file, the AppManager knows that configurations for the persistent/temporary folder are located in the app.
The created persistent/temporary folders of an app can be used by all app components.
The "datastorage" entry is structured as follows:
"datastorage":
{
"persistentdata": "true",
"temporarydata": "true"
}
persistentdata:
Boolean value for whether persistent memory is required
temporarydata:
Boolean value for whether temporary memory is required
3.8.2Specifications and restrictions
–The creation of a persistent memory does not require a restart of the PLCnext firmware
–Deactivating an app deletes its persistent memory
The procedure for using and configuring a Data Storage App Part is explained in the following demo sections:
–Demo PLCnext Runtime App (PLCnext-Process)
3.9Example of a complete app_info.json
The following shows the contents of an app description file in which all types of app parts are configured by way of example:
"plcnextapp": {
"name": "Full Multipat App",
"identifier": "FullMultipartApp",
"version": "112.12DemoVersion",
"target": "AXC F 2152",
"minfirmware_version": "19.0.0",
"manufacturer":"Phoenix Contact",
},
"engineerapp": {
"folder": "/arp/PCWE"
},
"cmdtools":
[
{
"path" : "/bin/DemoCmdTool"
},
{
"path" : "<Path to cmd tool executable binary>"
}
],
"plcnextextensions" :
[
{
"acfconfigpath" : "/PLCnextRuntimeDaemon.acf.config"
},
{
"acfconfigpath" : "<path to PLCnext extension .acf.config file>"
}
],
"linuxdaemons" :
[
{
"path" : "/bin/daemon1exe",
"cmdargs" : "arg1 arg2 … argN",
"starttime": "40"
},
{
"path" : "<Path to daemon executable binary>",
"cmdargs" : "<arg1 arg2 … argN>",
"starttime": "99",
"initScriptTemplate":"<Path to own template file>"
}
],
"sharedlibs":
[
{
"libpath" : "/lib/sharedlib1.so"
},
{
"libpath" : "<Path to shared library binary>"
}
],
"datastorage": {
"persistentdata": true,
"temporarydata" : true
},
"plcnextservices":
[
{
"service": "<Service ID>",
"action" : "EXCLUSIVE_ACCESS"
},
{
"service": "WBM",
"action" : "MUST_HAVE"
},
{
"service" : "OPCUA",
"action" : "MUST_NOT_HAVE"
}
]
}
|
|
|
Note: As mentioned earlier, these are optional app parts entries, dont use them if there are not needed or if their configured files do not exist in the app-container, otherwise the app installation on the target may be refused because of detected configuration errors. |
